
Photography is a beautiful art. It is also a technical one. You can create some fantastic images with composition alone. But if you want icing on that cake, you want to experiment with the Exposure Triangle. Photography is unfortunately tied to the laws of physics, so there are limitations in what you can do with a camera. But technology, especially with modern digital cameras, has overcome most of the shortcomings of early cameras. Even so, a good photographer must have a good understanding of the three components that affect your image.
Before we go on, we have to go over some basic vocabulary:
- Aperture – The aperture is a petal opening inside your lens. It creates a round opening that allows light into the camera when you take a photo. When speaking about exposure, we’re talking about the size of the opening, which is typically measured as a ratio. Most manufacturers will list it in fraction form, like f/11, or f/4. Others might simply list it as f11 or f4 (in both scenarios, ‘f’ represents the focal length, but don’t worry about that right now). This is a ratio, so the number acts counterintuitive: A lower number means a larger opening. For this reason, I prefer to write it as a fraction (for example, if f=1, 1/4 is larger than 1/16). Aperture ultimately controls the depth of field, where a larger aperture (1/4) will have a narrower depth of field compared to a smaller aperture (f/11).
- Depth of Field – The depth of field (or DOF) is simply the depth of the photo that is in focus. A narrow depth of field means that only a small depth within the photo is in focus. A large or deep depth of field means more, if not everything, is in focus. Several factors affect DOF, including the aperture, focal length, and distance from the camera. Ultimately, depth of field helps you to isolate a subject, or to ensure that more depth is clear within the frame.
- Exposure – When photographers talk about exposure, they may be talking about the combination of all elements of the exposure triangle: Aperture, Shutter, and ISO. They could also be talking about simply taking a photograph or the quality of the photograph they may be observing (“That’s a great exposure!”). Under-exposed means that the photo is darker than expected, whereas over-exposed means that it’s brighter/lighter than expected.
- ISO – ISO is the measurement of the sensitivity of the digital sensor. If you’re shooting film, this is also sometimes referred to as ASA or ISA. But these days, ISO seems to be the most commonly used. Simply put, ISO is the “speed” of the film or sensor. With film, this is a fixed number until you change the roll of the film, whereas a digital camera can be changed on the fly. Whether you’re shooting film or digital, a lower number (ISO 100) has a tighter grain, which means the photo may be more crisp or sharp. But it requires a lot of light and isn’t ideal for indoor photography. Higher ISO responds to light very favorably but can introduce grain (film) or noise (digital) to the image. Some modern cameras can shoot very high ISO of 2400 ISO or more (6400, and 12800 aren’t uncommon), which gives you a lot of capabilities shooting in low light, but it does add a lot of noise. In general, you want to shoot at the lowest ISO possible, but light is a factor. If you’re bolted down on a tripod with still subjects, you’ll be able to go very low on your ISO. But action/sports photographers may be willing to have a little more grain/noise if it means freezing a moving subject.
- Shutter (Shutter Speed)- The shutter is most often a curtain on your camera that sits between the lens and the sensor or film. Its job is to expose the sensor/film for a specific amount of time. This allows you to either freeze time or let the motion blur a little bit. Some cameras, like a mirrorless camera or a camera phone, don’t have a physical shutter. Those types of cameras may just turn on the sensor for a short amount of time, or they have a different type of shutter. Shutter Speed is often shown as a fraction of a second where 1/4s is relatively slow and 1/8000s is very fast (so fast not all cameras will offer speeds that high).
Using the Exposure Triangle?
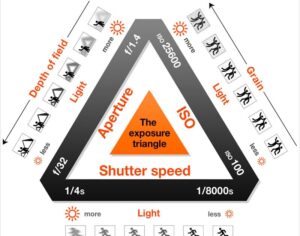
The exposure triangle is made up of three factors: ISO, Aperture, and Shutter Speed. Think of each component as making up one leg of the triangle, similar to the one at right. Each leg has a value from the lowest value to the highest. For example, the ISO leg will go from the lowest ISO available to the highest. The highest and lowest values for each category will depend on the camera you are using. In short, the triangle helps you understand the relationship between each leg or component of the triangle. Finding the perfect exposure is a balancing act between these three components. In any of the program, auto, or priority modes, your camera is ultimately doing the work for you. But you still need to have an understanding of how this works, because even in full auto mode, you can still influence the exposure of the shot by manipulating outside factors. In a perfect world, you could choose any combination of factors that you wish. But ultimately, light is going to be the limiting factor. So let’s explore how these legs relate to each other. But let’s first get an understanding of each leg.
Aperture affects how much light gets into the camera. A larger aperture lets a lot of light in very quickly, whereas a small aperture lets very little light in during the same amount of time. If ISO and Shutter Speed were not factors, aperture also affects the depth of field. With a large aperture, light is coming in quickly from all angles, and so the depth of field is greatly reduced. A small aperture keeps the light focused, and so more will be in focus.
Shutter Speed affects how long the frame is exposed. These are most often fractions of a second, so to a human that seems very fast. But to light, that is very slow. The impact of shutter speed is most noticeable with moving subjects. A fast-moving subject with a slow shutter speed will result in motion blur. Depending on your intent, this may be favorable. But if you want to freeze motion, a faster shutter speed is critical.
ISO is the sensitivity of the sensor. With digital, you can change this on the fly. But with film, you cannot change ISO without physically changing the film. A higher ISO means the sensor or film is more sensitive to light, which means it sees more light. A higher ISO will allow you to use a smaller or faster shutter speed. But high ISO does introduce some grain or noise into the shot. This can be a tradeoff…a little grain in the photo may not be a concern if it means capturing the shot. Sports photographers may shoot with a higher ISO than a bolted-down still-life photographer who may not want any grain. Cameras have gotten incredibly good at handling high ISO, but this is still a critical factor.
A Balancing Act
As you probably have figured out, adjusting any one aspect of the triangle affects the other two:
- A high ISO allows faster shutter speeds or smaller aperture, but will introduce more grain.
- A high aperture will allow you to use a faster shutter speed, or a lower ISO, but will result in a narrower depth of field.
- A high shutter speed may require a higher aperture or higher ISO, but it allows you to freeze the shot.
In all cases, the factor we aren’t talking about is light. In all of the above cases, we were assuming the light is the same. So this is where manipulating outside factors comes into play. Introducing more light allows you to use a smaller aperture, a faster shutter speed, or a lower ISO. Here are just a few recipes to think about:
- Freezing the shot in low light: In a low-light scenario, freezing motion can be difficult because a high shutter speed reduces the light available to the sensor or film. To compensate, you could raise the ISO and introduce grain, or open the aperture more and narrow your depth of field. But suppose you don’t want that grain, or you want a deeper DOF? You’re going to have to add light. A flash may add enough light to allow a higher shutter speed without increasing the ISO or aperture size.
- Silky Smooth Movement in daylight: The only way to introduce motion blur to a shot is to have a longer shutter speed. This is very difficult in mid-day sun because there is so much light that a slow shutter speed will blow out the exposure, even with a low ISO or a small aperture. This is where a Neutral Density (ND) Filter comes in. An ND filter is simply a smokey piece of glass that you can stick in front of your lens. It cuts the amount of light getting into the camera, which allows you to lower the shutter speed without overexposing the shot.
- A Haunting Shot: Grain isn’t always bad. You can intentionally increase the ISO to introduce a lot of grain and noise to the shot. This can add an old-timey effect (though it’s not quite the same as film grain). But it can also create some interesting light refractions when you click the shutter button. This works well when converting to black-and-white, because some noise will have an odd color to it.
This background is only scratching the surface of the Exposure Triangle. It is a factor in so much of what we do as photographers. So I expect to reference this article many times. If you’re just beginning, just keep this all in the back of your mind. And by all means, please experiment to better understand the relationship. As you get into priority modes, you’ll be directly controlling one aspect of the triangle, and this relationship becomes all that more important. But don’t get too swept up in the details just yet. Simply recognize that each leg will affect the other two when you take the shot.